High Ho the Floor is Done!
(sung to the tune of “High Ho the Witch is Dead” from the Wizard of Oz)
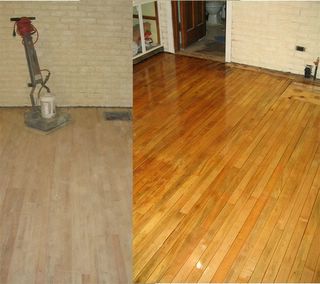
Yes, finally, the floor is done, after a few setbacks, of course.
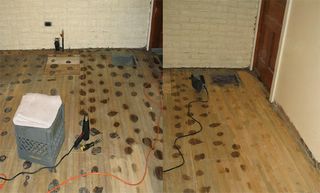
I filled in the score marks from pulling up the old flooring with an old-fashioned mix of sawdust and wood glue, which is recommended by places like “This Old House” because you get an exact match to the wood you’re working on. Well, apparently some sort of chemical reaction took place, because although it dried perfectly fine in some spots, in others it dried to a tannish-green shade that stuck out like a sore thumb. I have used more tools on this floor than on any project EVER! I used a wood chisel and a mallet to knock out the bad filling, then used the same chisel and mallet to blend the scores into the same level as the rest of the floor – yes, it left some dips, but it is an 80 some year old floor, and dips are far less noticeable than score lines in a different color.
When I first pulled up the old flooring I couldn’t figure out why someone would cover up a perfectly good oak floor with linoleum, but I know now…that floor is hard as a rock! When I rented the vibrating sander the guy at the rental shop asked me what kind of floor I was working on and recommended that I get a drum sander instead, but I told him I was concerned about gouging the floor because it was such a small space and I wouldn’t be able to maneuver easily. Next time I’ll listen, because if floors could laugh mine certainly was. I ended up taking my belt-sander to the spots left by the adhesive. The sander was a cheap one, $35 at Big Lots, and by the time I was done sanding out all of the spots the guide that kept the sandpaper in place had worn down and it was shooting sparks…I just kept praying to the power tool gods that it wouldn’t blow up before I finished (and it didn’t…I’ll have to sacrifice a goat or something to thank the powers that be).
I went over the floor many, many times with the vibrating sander, starting out with 20-grit paper. I wasn’t able to get all of the scratch marks out of the floor, but it smoothed out reasonably well, and I figure this is an old house, with character; hopefully scratches in the floor constitute character, because I just couldn’t sand any more (my entire body continued to vibrate for days after I returned the vibrating floor sander). I ended up using my Dremel to clean up the spots under the cabinet ledges and along the edges of the floor where the big sanders couldn’t quite reach (like I’ve said – I used more tools on this project than any single other project I’ve ever done).
Sweep, vacuum, tack cloth, and on to the first coat of sealant. Little bits and pieces of chinking got pulled up by the brush, even after all of the clean up, so I had to be careful to get them out before it started to dry – my fingers ended up getting varnished as well on that first coat. NOW, three layers of finish, sanded in between coats, and the floor is shiny, pretty, and far better looking than the old worn out linoleum…
Uh oh, I just walked in the kitchen for more coffee, and the sun shining through the window revealed a spot with visible brush marks. I’m just going to have to leave that alone for a while – or run screaming though the front door, never to return!!!


